My Lemon Sweet Rolls are pull-apart soft, fluffy, and packed with lemon flavor. This is one of those recipes that looks impressive but is actually very easy to make. You don’t need any fancy equipment or special ingredients to bake the softest, most tender rolls.
They do take a bit more time than my usual recipes, but the best part is that most of it is hands-off rising time. In my experience, the result is absolutely worth it.
I make these all year long whenever I want something special for a slow weekend breakfast, brunch with friends, or a family gathering. Over the years, they’ve become one of those recipes everyone looks forward to, so let me show you how simple they really are to make.
Lemon Sweet Rolls with lemon glaze and fresh zest.
My Lemon Sweet Rolls don't really need much introduction, they kind of speak for themselves once you see them. I first made this recipe years ago, and honestly, I barely remember the first time because they became a regular so quickly. They earned an immediate spot in my recipe book and family gatherings.
And if you’re in the mood for another lemony bake, Rita’s Lemon Zucchini Cake is a must-try. It’s one of those easy, moist cakes she makes all the time when we want something simple but still special.
I’ll stop rambling now, because staring at these photos again just sent me straight to the kitchen for another roll!
What You'll Need
Now, my lemon sweet rolls use a few more ingredients than most of my recipes, but don't be intimidated! They're actually pretty easy to make. I'm going to show you exactly how I make these delicious rolls step by step.
Just make sure to read the whole recipe first, because I share a few tips and little secrets along the way to help you get the softest, fluffiest rolls possible. After the first try, you’ll probably be able to make these with your eyes closed, haha!
Now, let’s take a look at exactly what you’ll need to grab.
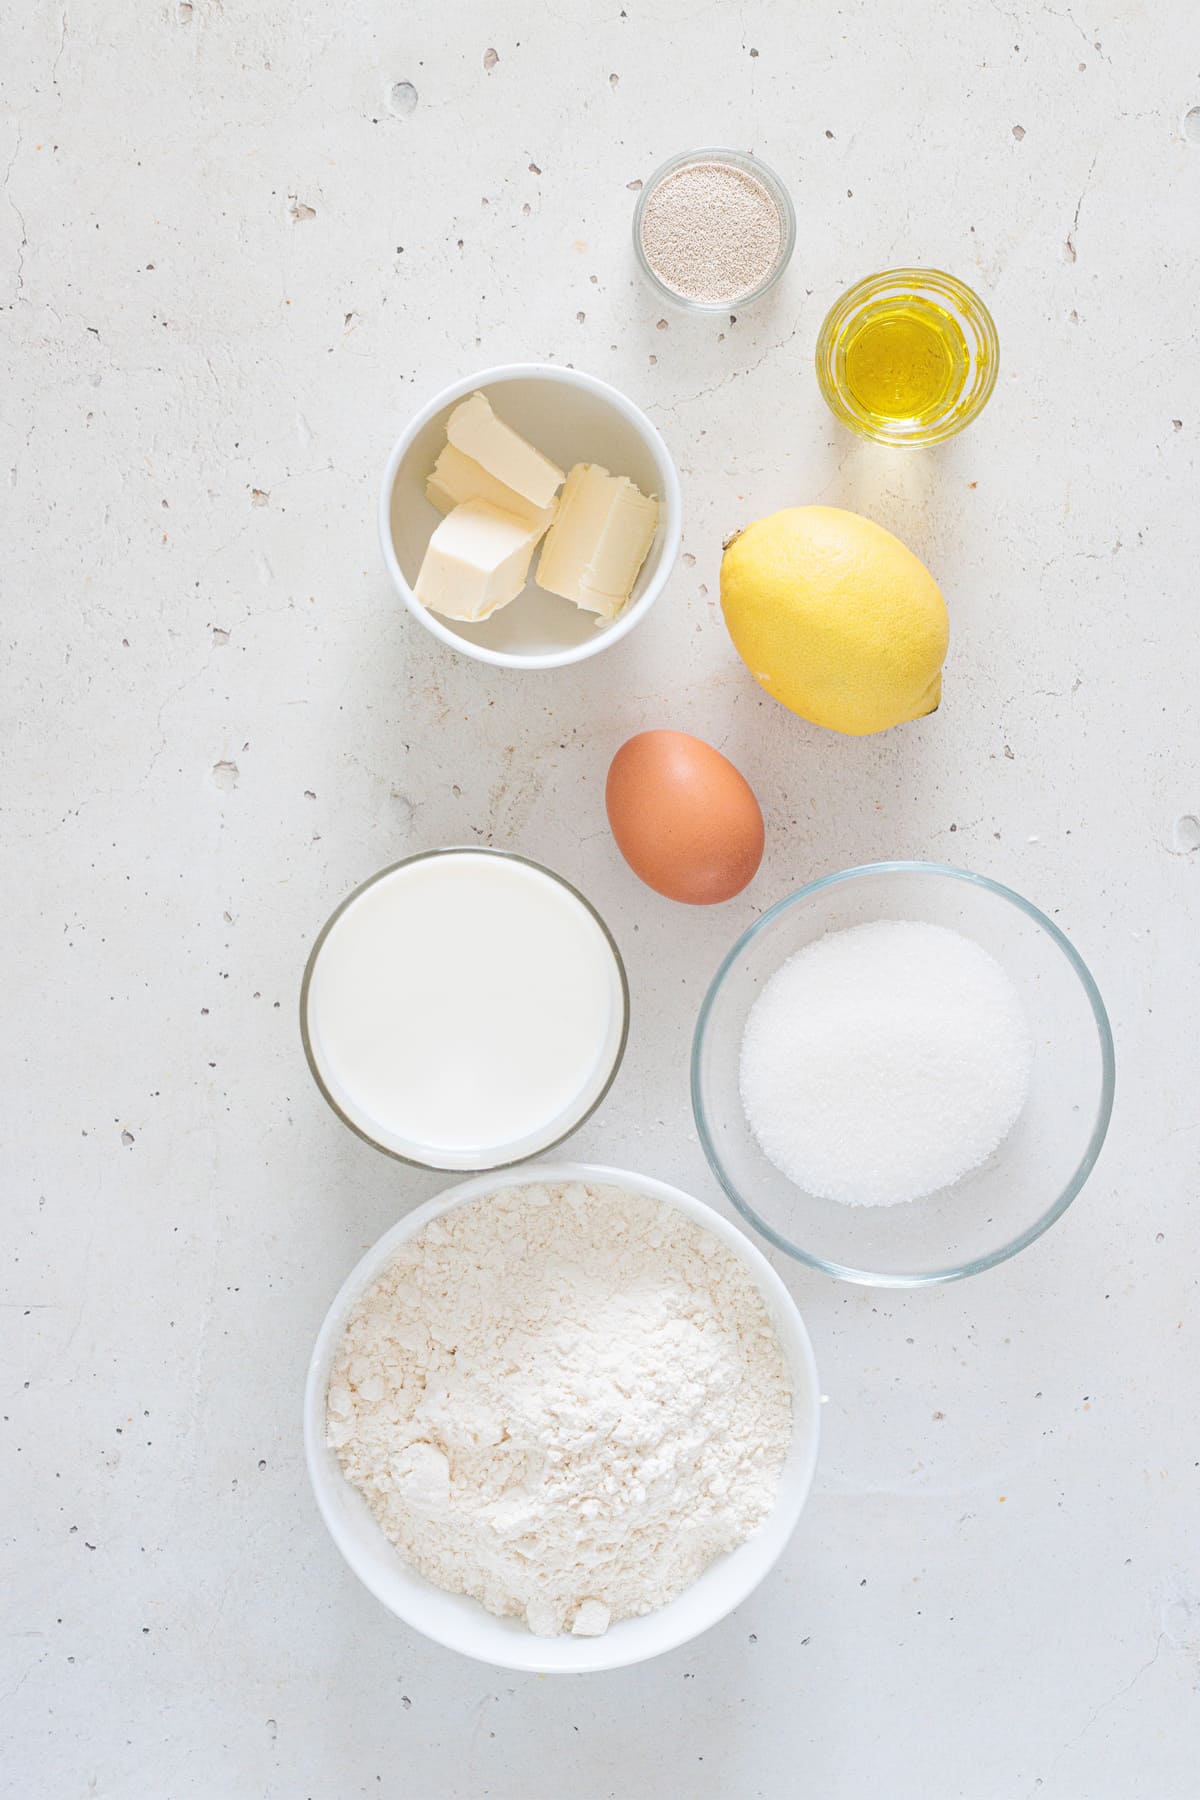
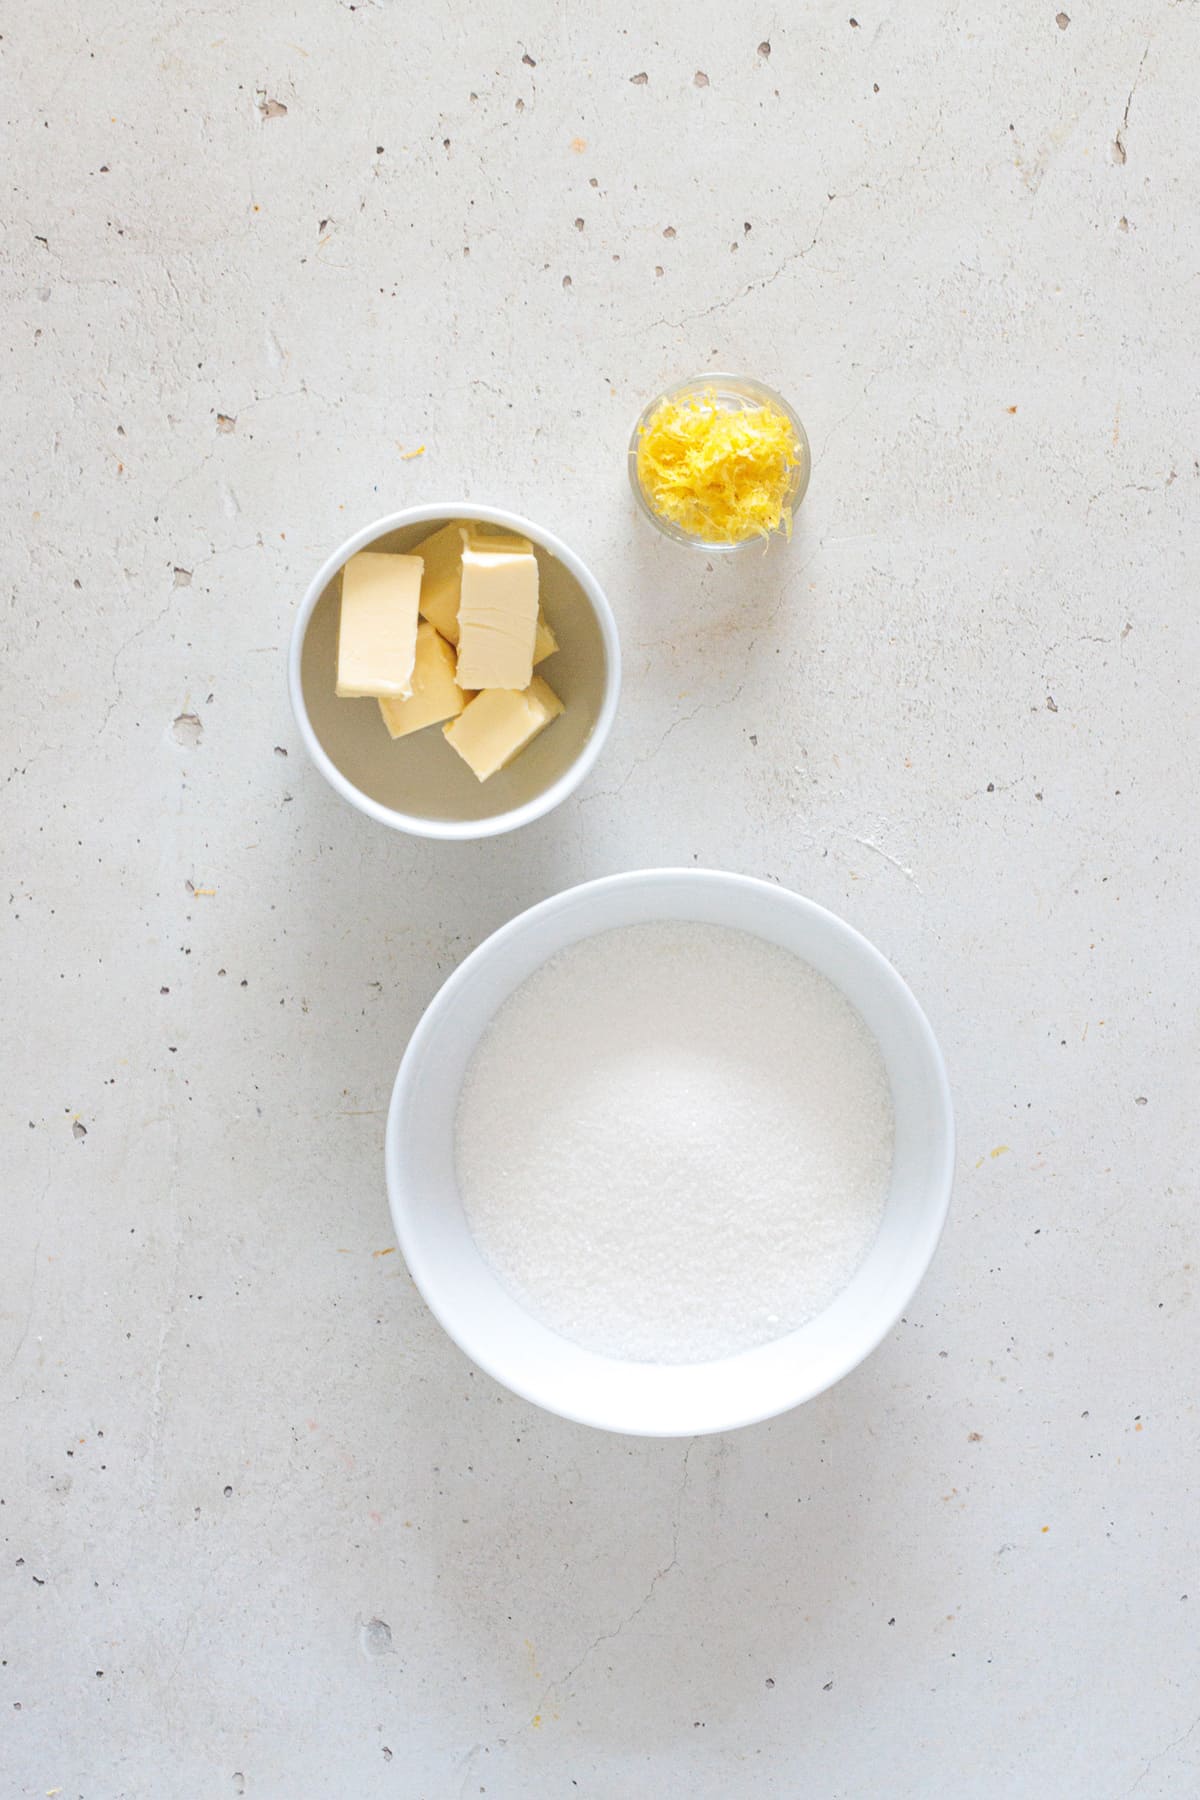
Ingredients for Lemon Sweet Rolls
For the dough:
1 ½ cups warm whole milk (about 110°F, 360ml) - I always use whole milk for this recipe because it gives the rolls a richer texture and keeps them softer once baked. I warm it to about 110°F, just warm to the touch and never hot.
2 ¼ teaspoons instant dry yeast (1 standard packet or 7g) - I’ve used different brands and they’ve all worked great. Just make sure your yeast is fresh. Old yeast from the back of the pantry is one of the most common reasons rolls don’t rise.
1 large egg, at room temperature - Don’t use it straight from the fridge. A room-temperature egg helps everything combine more smoothly and evenly.
3 tablespoons granulated sugar (40g) - I use regular white granulated sugar. Any brand works just fine.
2 teaspoons grated lemon zest - I like to use freshly grated zest. It makes a big difference, giving the rolls a deeper lemon flavor without adding extra liquid.
3 tablespoons unsalted butter, melted (45g) - I recommend using unsalted butter so you can fully control the flavor and salt level. I’ve used salted butter before, and the dough ended up a bit too salty for our taste.
4 to 4¼ cups all-purpose flour, sifted (500-530g) - My go-to is Bob’s Red Mill Unbleached White All-Purpose Flour, because it’s consistent and gives the dough great structure while still staying soft.
1 tablespoon olive oil (for greasing the bowl) - I use a little olive oil to grease the bowl so the dough doesn’t stick and can rise easily. Any neutral oil works here.
For the filling:
5 tablespoons unsalted butter, softened plus about 2 teaspoons for greasing the pan (70g + 10g) - Make sure it’s softened but not melted. It should spread easily.
¾ cup granulated sugar (150g) - Again, regular white granulated sugar works perfectly here.
Zest of 2 large lemons - I like to use the zest from two lemons for a brighter, more noticeable lemon flavor, but you can use just one if you prefer a milder citrus taste.
For the lemon cream cheese glaze:
4 ounces cream cheese, at room temperature (115g) - My go-to is Philadelphia block cream cheese for the smoothest, creamiest glaze. Make sure to use the block version, it blends much better and leaves no lumps.
1¼ cups powdered sugar (150g) - I use regular powdered sugar here. Any brand works just fine.
¼ cup fresh lemon juice (about 1 large lemon, 60ml) - I always use fresh lemon juice here. I’ve tried bottled juice before, but the flavor was flatter and more acidic.
Using the following ingredient I get 12 rolls, by slicing the log into pieces about 1½ inches thick. I feel like this gives them a really nice size and just the right amount for one serving (or two, haha!).
For fun, I’ve also cut these into smaller, more bite-size rolls and get about 20 pieces, slicing the log into pieces about ¾ inch thick. They’re just as fluffy and flavorful, only easier to eat, and they’ve been a huge hit as well.
How To Make My Lemon Sweet Rolls
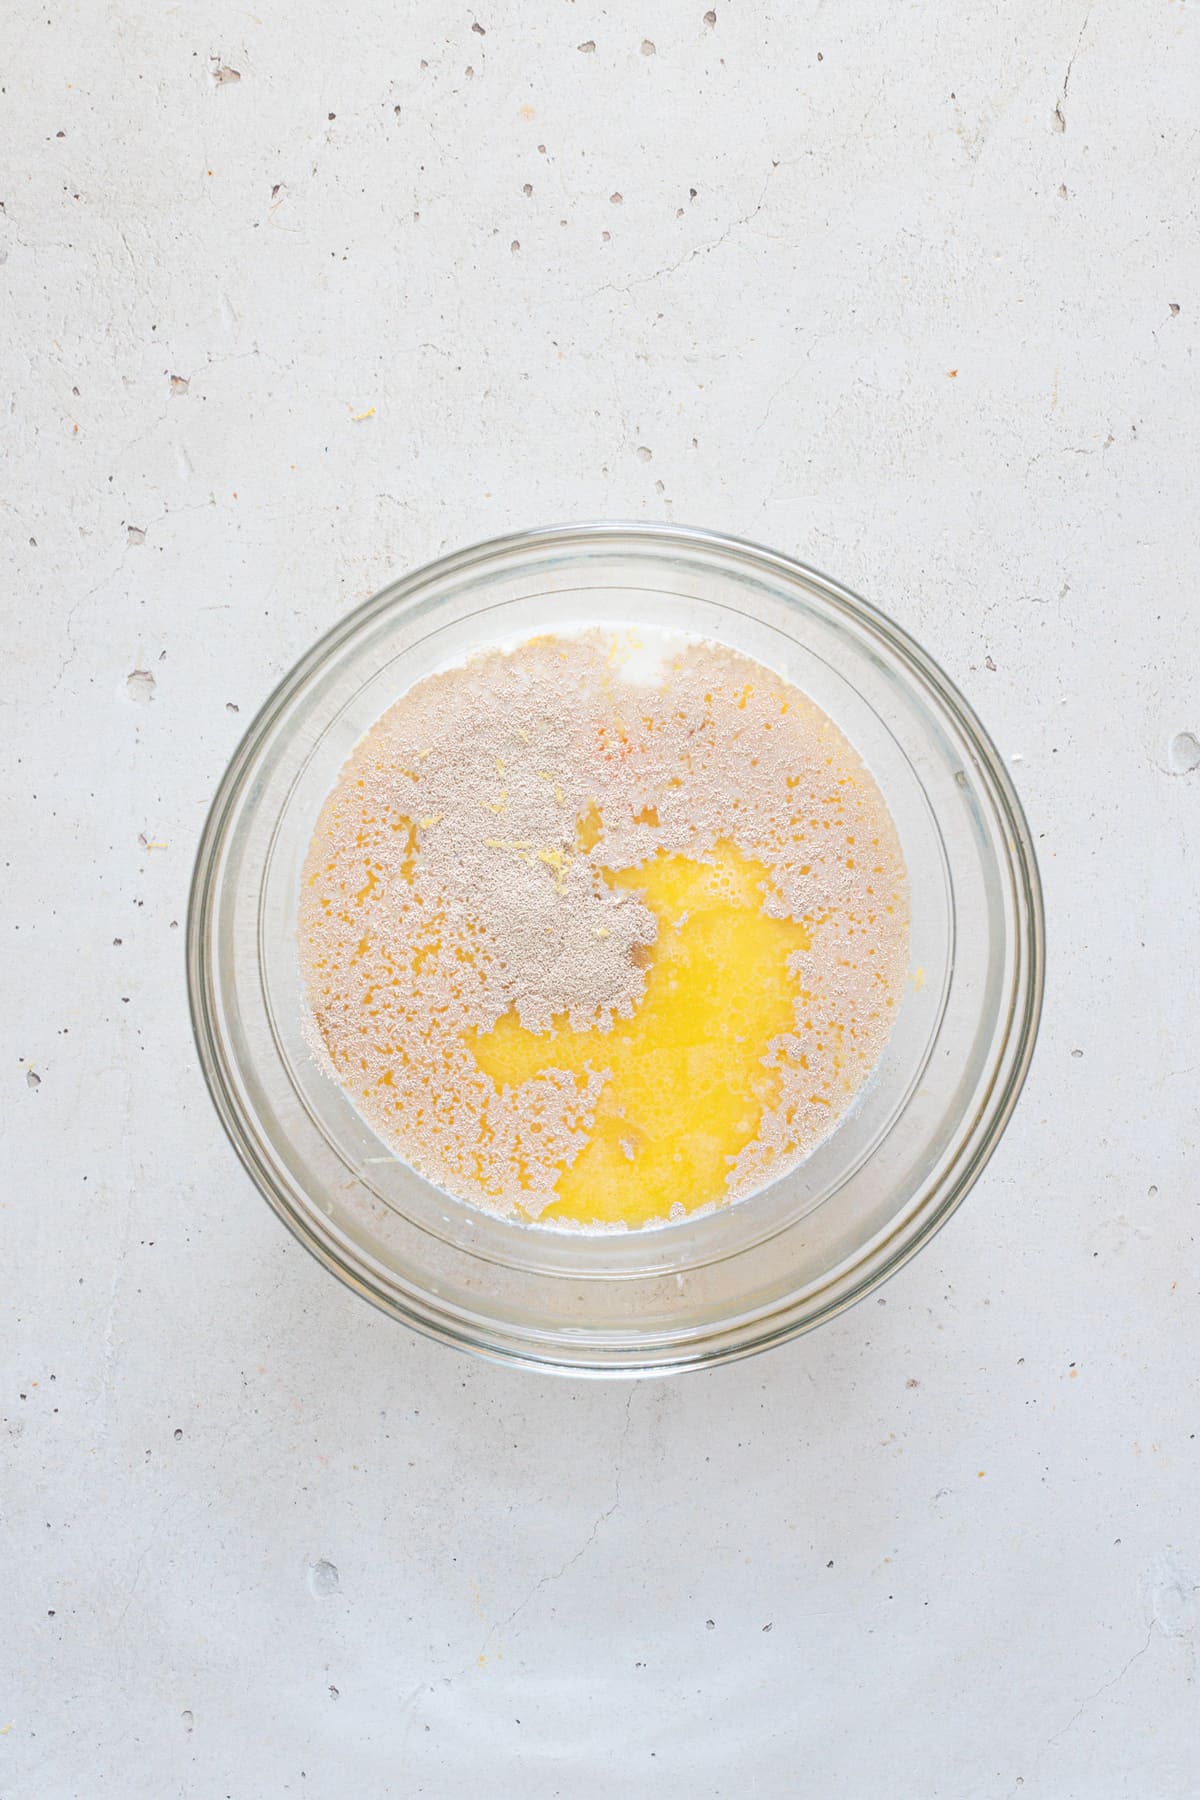
I start by warming the milk in the microwave in 30-second intervals until it feels warm to the touch (similar to warm bath water) or reaches about 105°F. If the milk is too hot or starts to boil, it can kill the yeast, so make sure it’s just gently warm!
Next, I grab a large bowl, since the dough will rise to about double its size. I add the warm milk and sprinkle the yeast over the top. I let it sit for about 5 minutes, until foamy. You can't skip either of these steps. The milk needs to be warm, and the resting time is what activates the yeast so the rolls rise properly.
I add the melted butter, egg, sugar, and lemon zest and whisk until smooth.
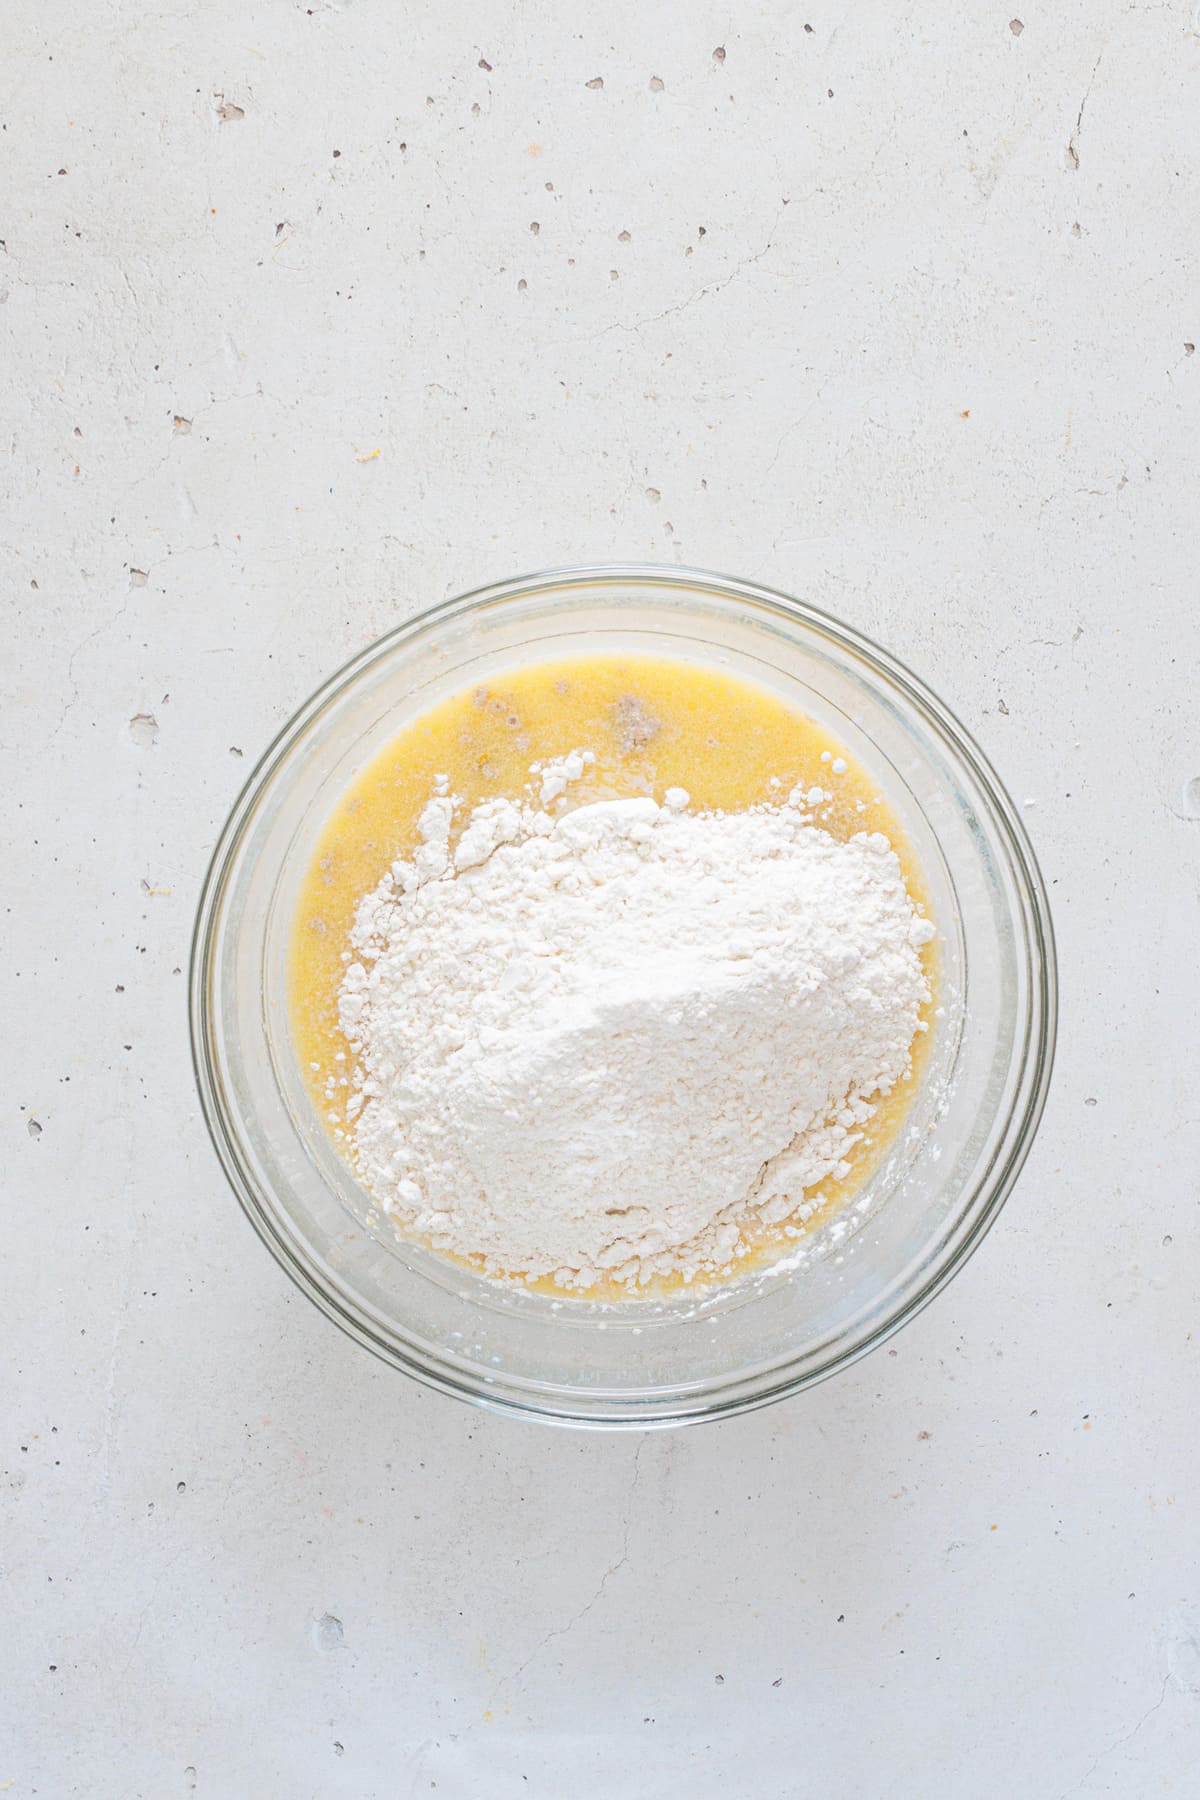
Once the wet ingredients are combined, I start adding the flour gradually, not all at once. This helps me control the dough’s texture. Depending on humidity and the type of flour used, you might not need the full amount.
Add warm milk, yeast, egg, sugar, lemon zest, and melted butter to a bowl.
Add flour gradually and mix until a soft dough forms.
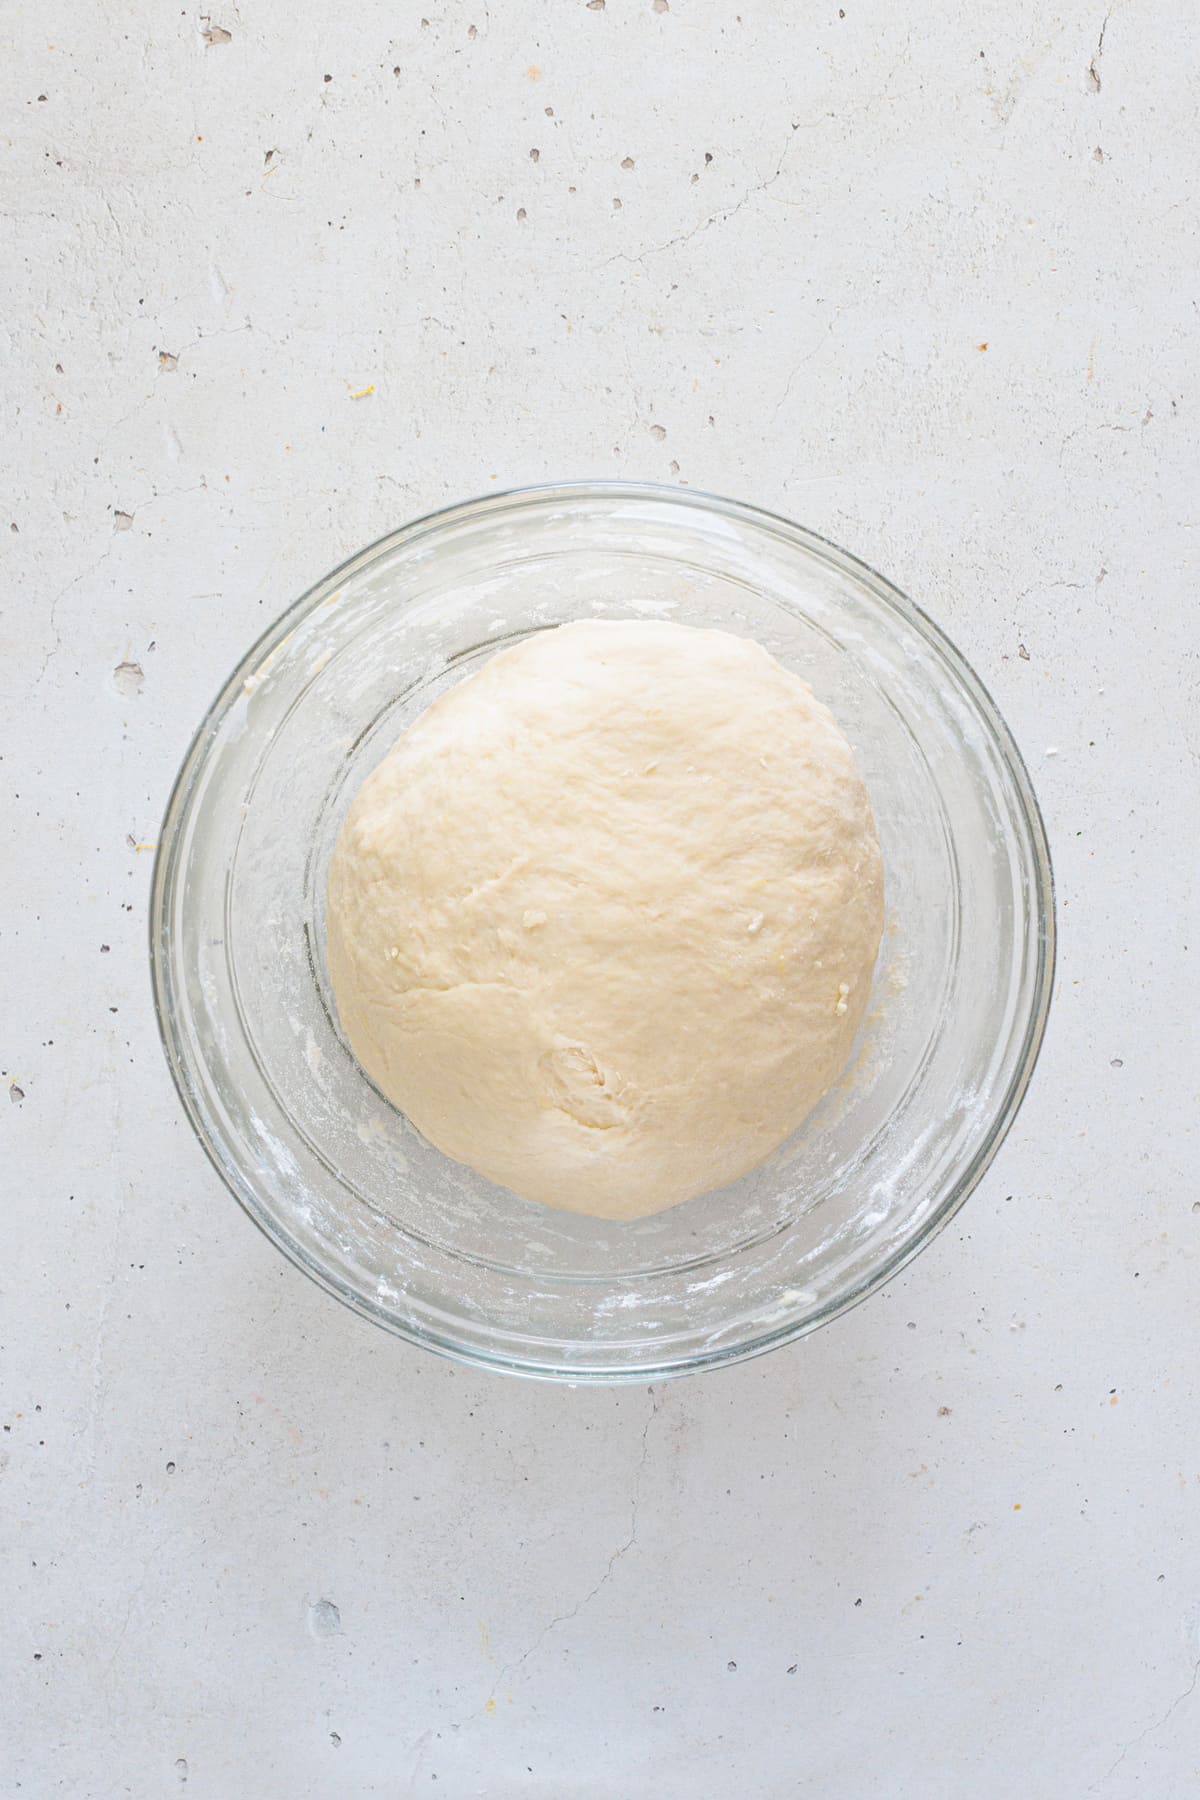
I lightly mix until a soft dough forms, then knead it for about 5 minutes, until smooth and elastic. You can do this step in the bowl, but I prefer kneading on the counter because it’s easier to fully grab and work the dough.
I’m looking for a dough that’s slightly tacky but not sticky. This texture gives the rolls a softer crumb once baked. If the dough still feels too sticky, I add the remaining ¼ cup of flour, a little at a time. You don’t want the dough to be too dry, or the rolls will turn dense after baking.
After kneading, I place the dough in a lightly oiled bowl, cover it, and let it rise until doubled in size. Depending on how warm the kitchen is, this usually takes about 2 hours, but in colder weather or during winter, it can take a bit longer.
Knead the dough until smooth and elastic.
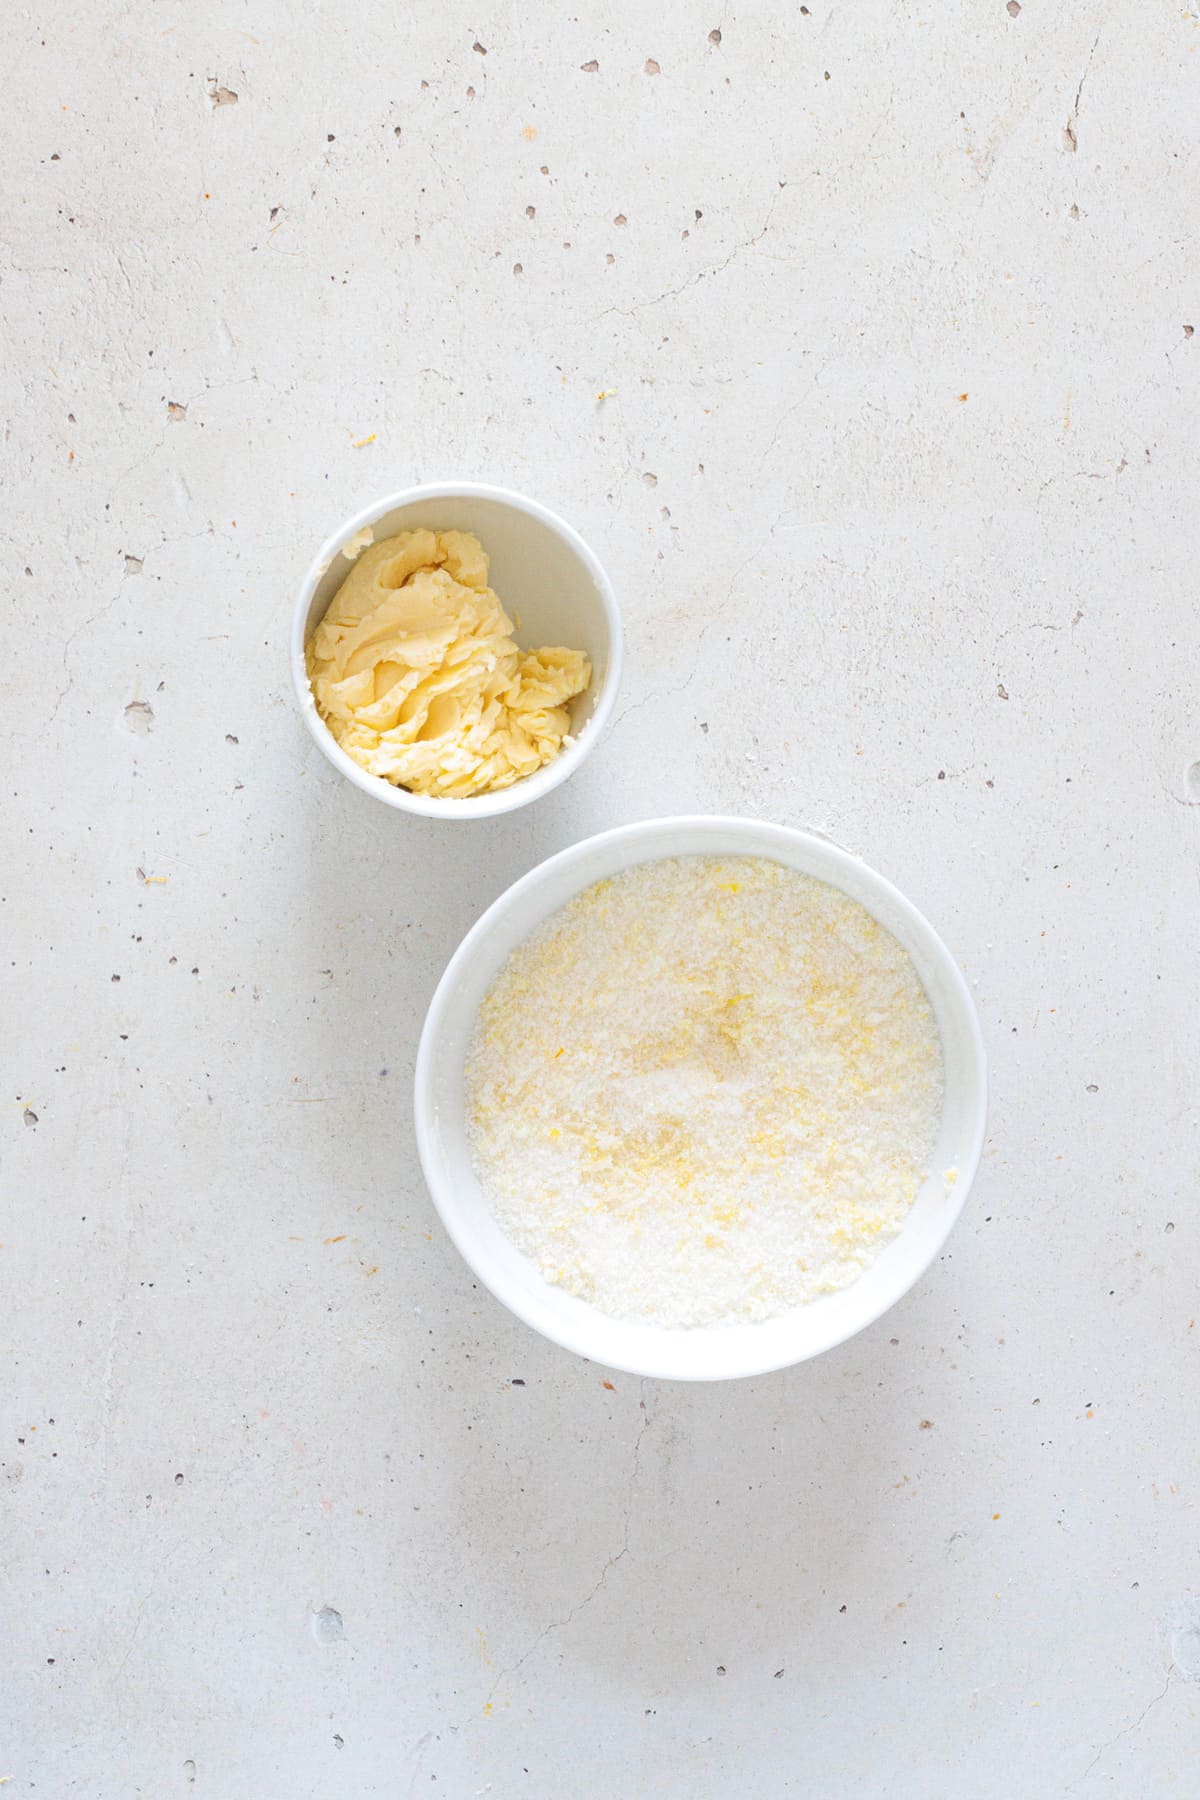
Once the dough is nearly doubled in size, I prepare the filling. I add the lemon zest to the sugar and rub it together with my fingers. This friction helps release the lemon’s natural oils, giving the rolls a much stronger citrus flavor without adding extra liquid.
Next, I mash the softened butter with a fork. At this point, it’s very soft but not melted, almost creamy. This makes it easier to spread evenly over the dough.
Ingredients for the filling.
Rub lemon zest into the sugar.
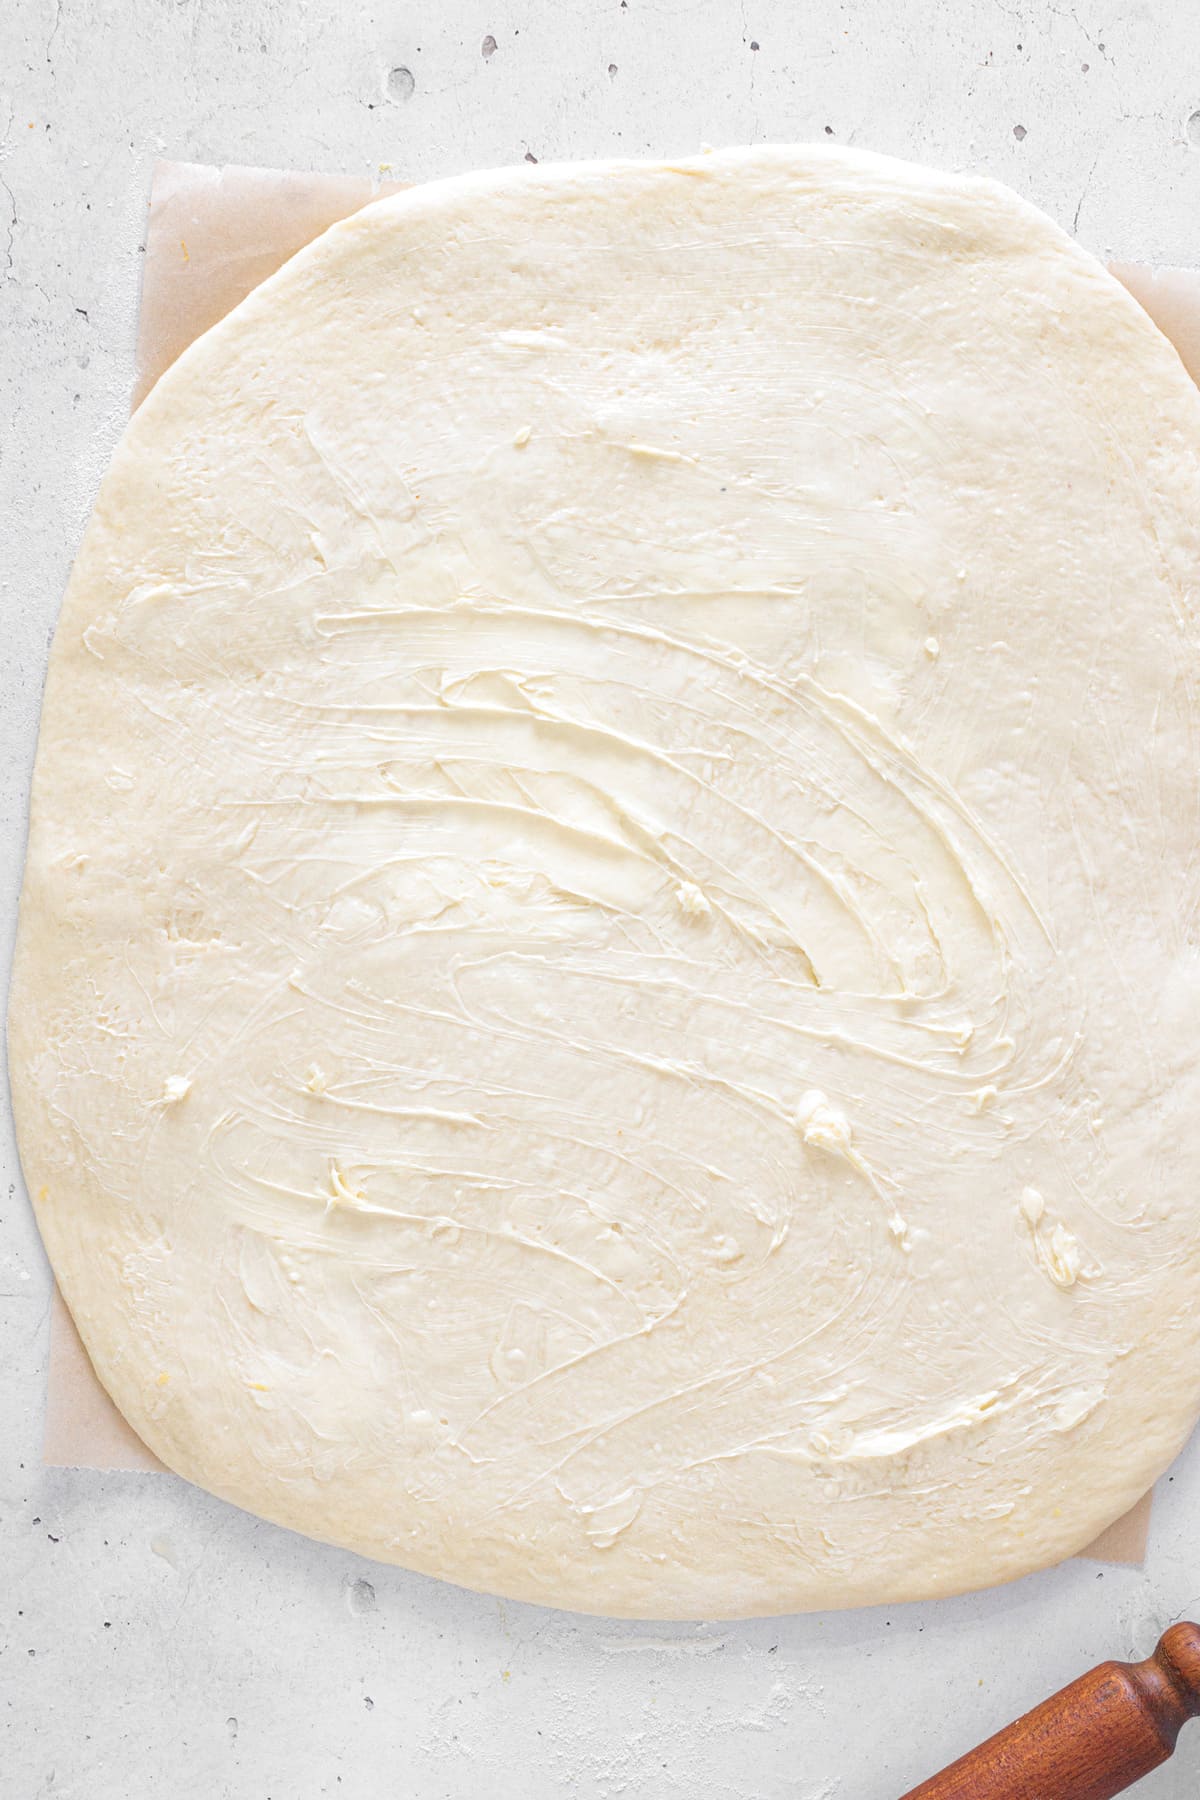
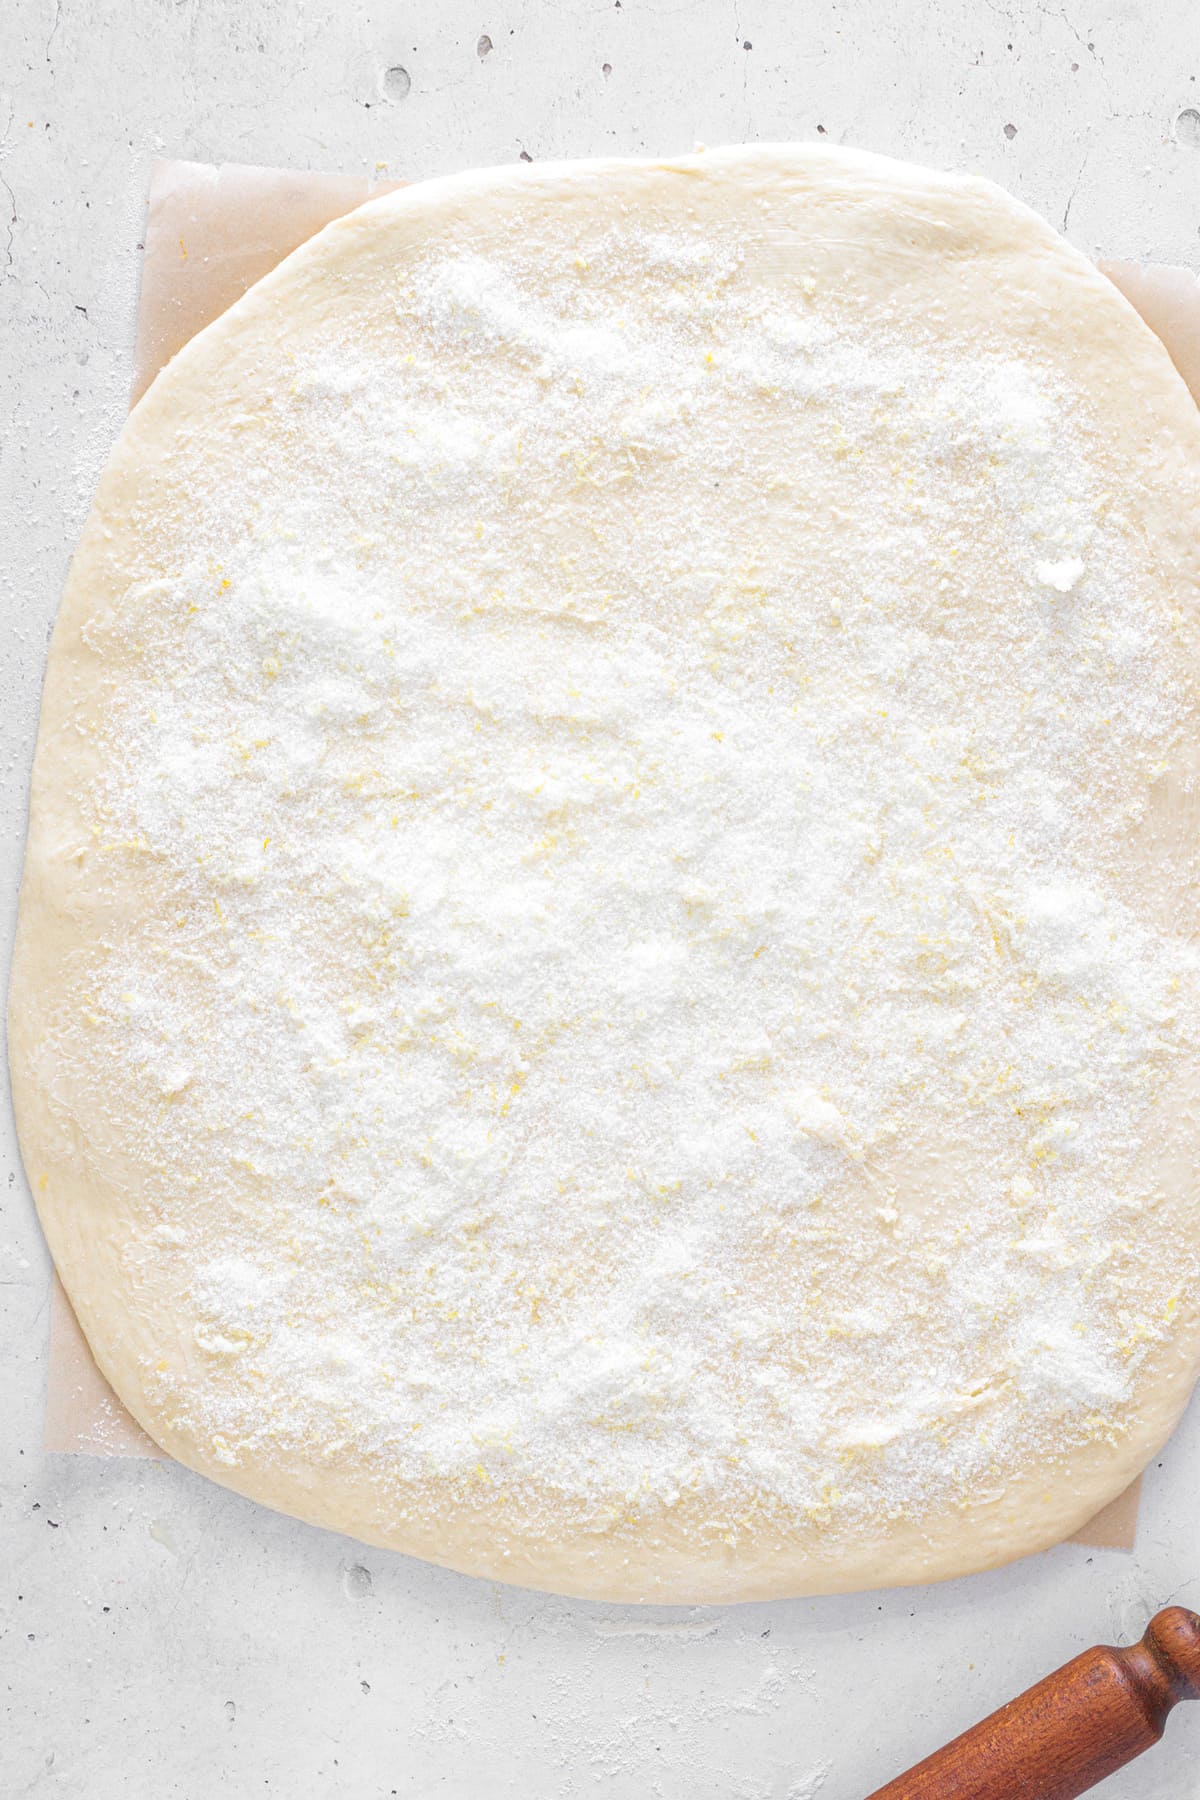
Once the dough has fully risen, I roll it out into a large rectangle about 16 × 12 inches and roughly ¼ inch thick (about the thickness of my pinky finger). It doesn’t need to be perfectly symmetrical, but keeping the thickness fairly even helps the rolls bake evenly.
I spread the softened butter evenly over the surface, then sprinkle the lemon sugar mixture on top. I like to take my time here to make sure everything is well distributed. This helps every roll bake with the same flavor and texture.
Roll out the dough and spread with softened butter.
Sprinkle the lemon sugar evenly over the dough
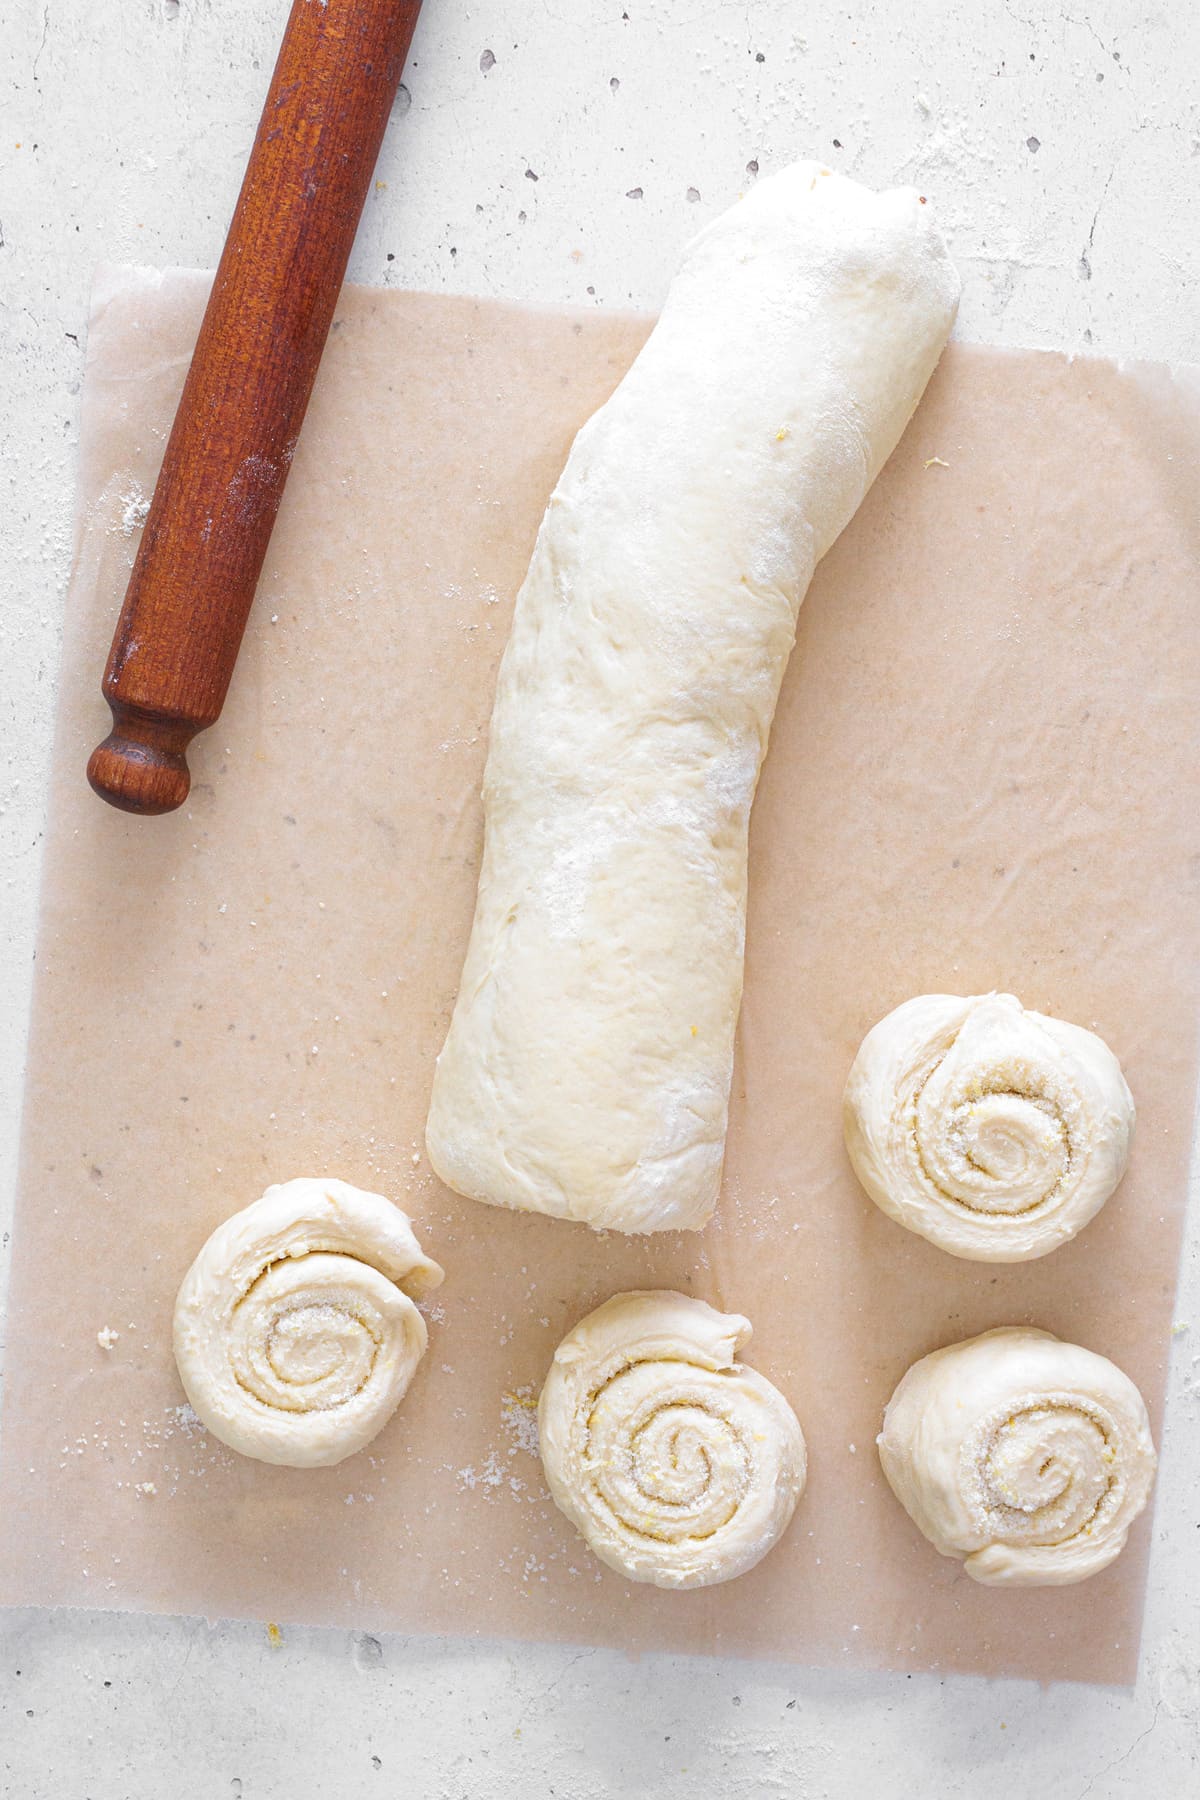
I roll the dough tightly from the long side into a log. Rolling tightly is important, otherwise the rolls can unravel while baking (I’ve had that happen before). Using a sharp knife, I slice the log into even pieces, about 1½ inches thick (roughly the width of two fingers).
You can also use that viral TikTok trick with unflavored dental floss. I’ve tried it a few times, but I find it tends to squish the dough as it cuts, so I personally prefer using a knife.
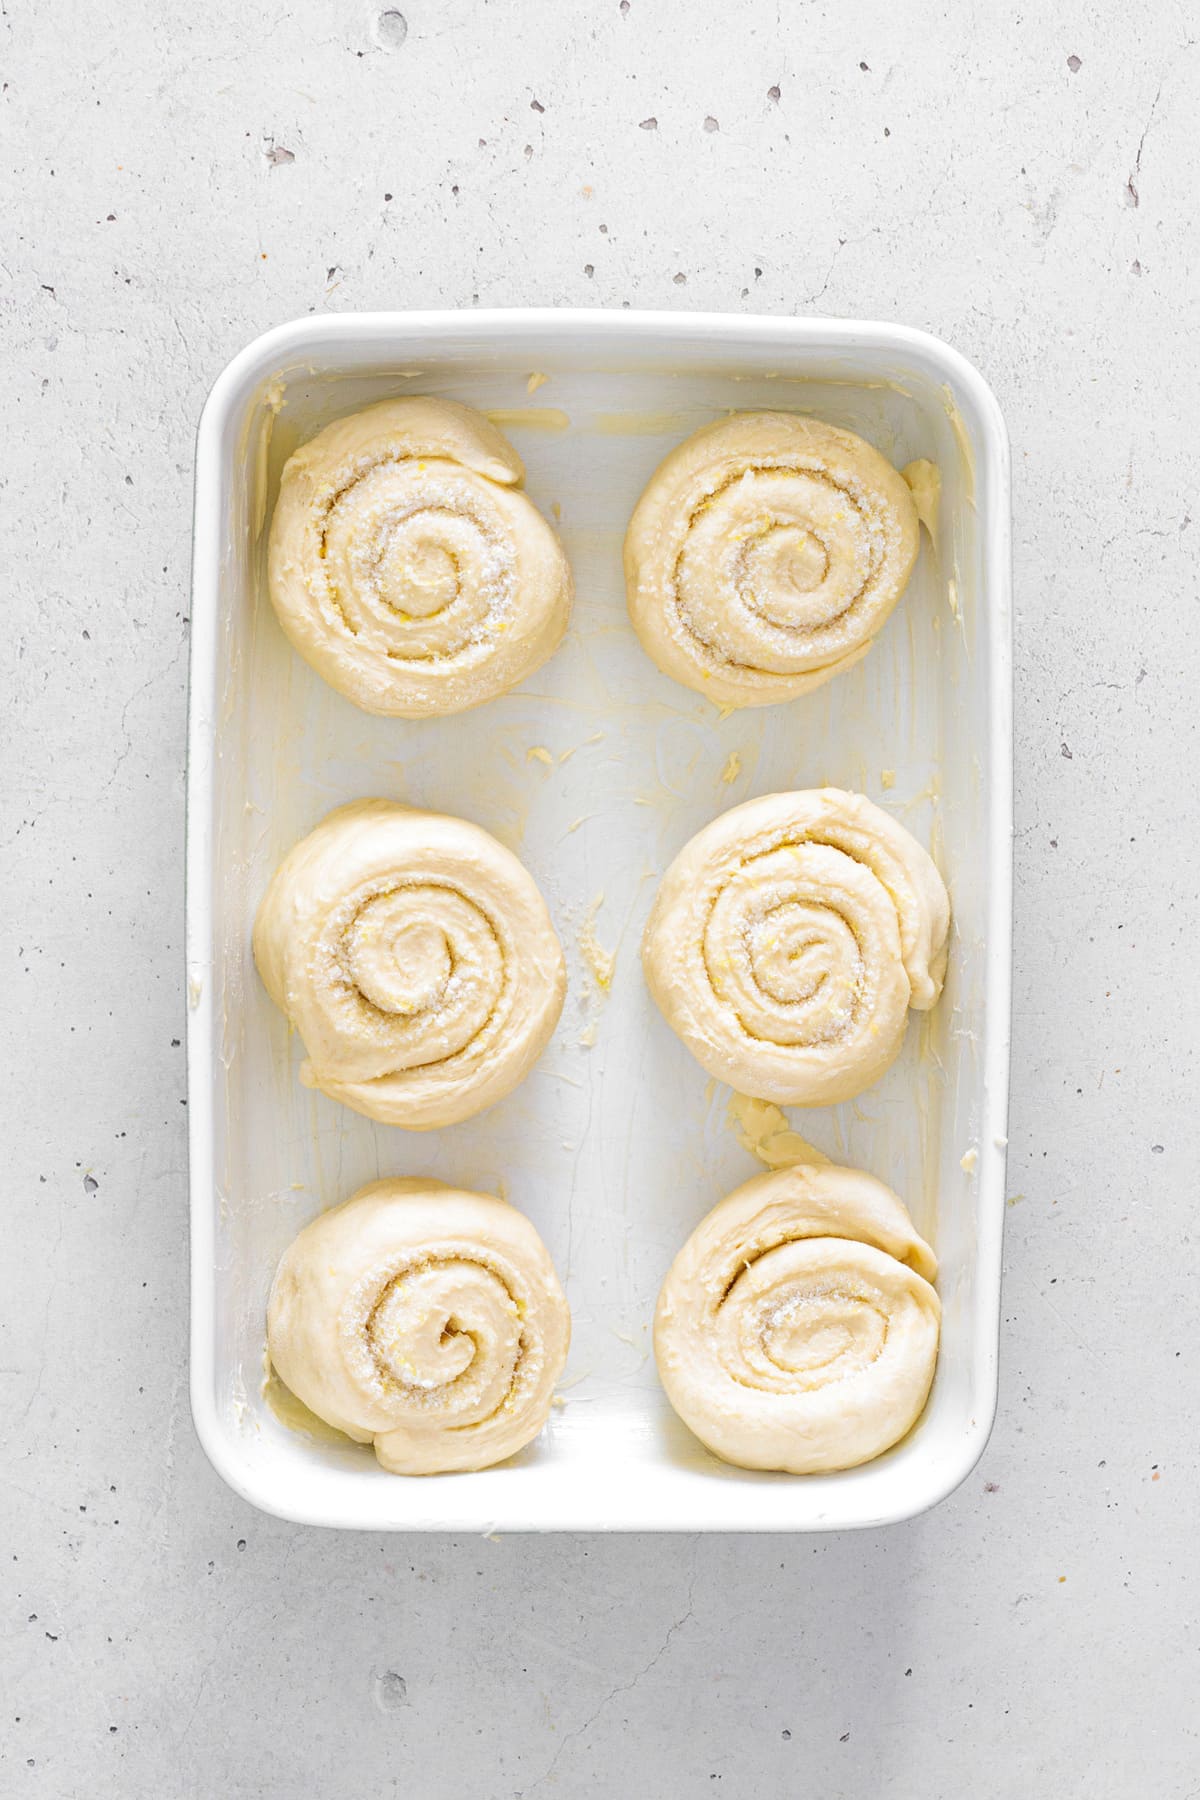
Before transferring the rolls, I make sure to pinch and seal the loose edge of the dough so it doesn’t open while baking. Then I butter a baking dish generously and arrange the rolls inside, leaving a little space between each one.
My secret to light and fluffy rolls is a second rise. I cover the pan and let the rolls rise again for about 45 to 60 minutes, until puffy and nearly touching. This step makes a huge difference in their final texture once baked, it’s absolutely worth the wait!
Roll the dough tightly and slice into even rolls.
Arrange the rolls in a buttered baking dish to rise.
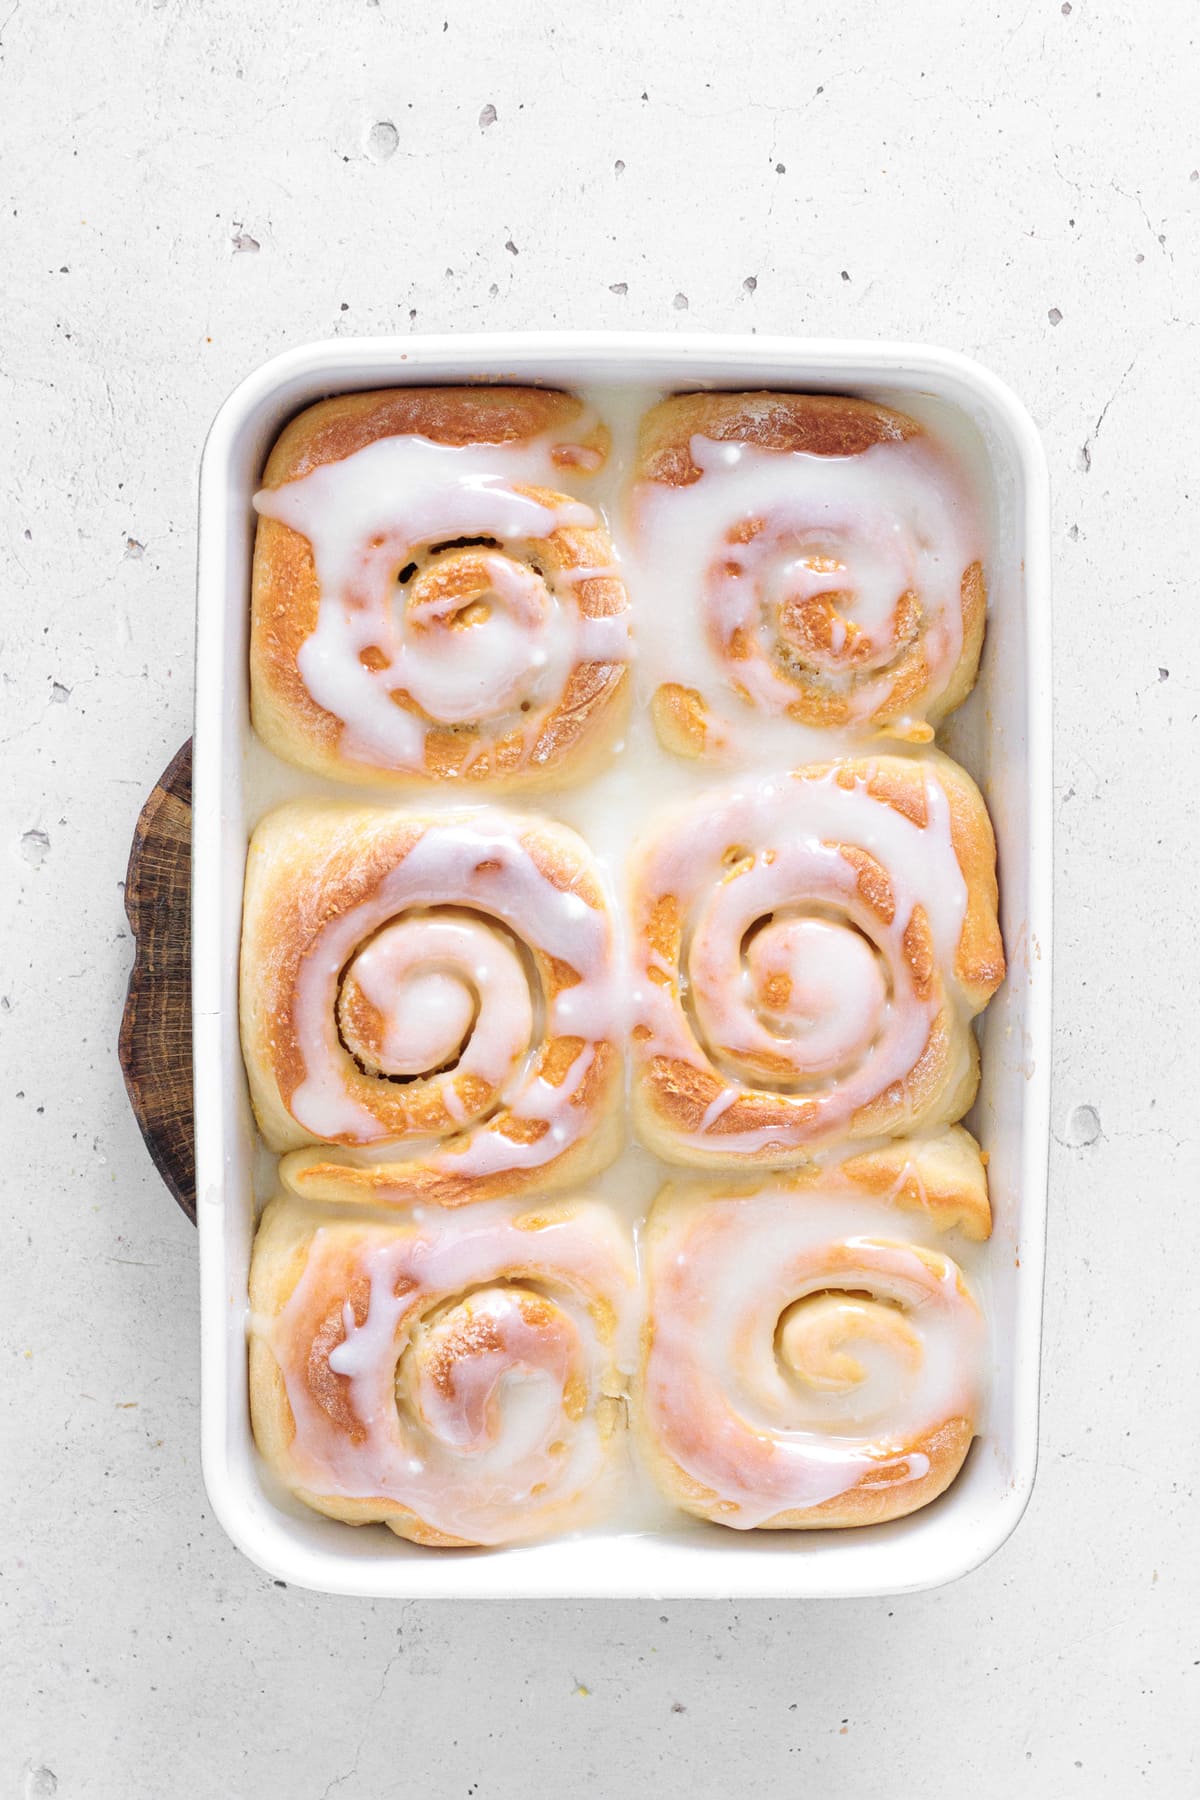
I like to brush the tops with a little milk before baking. This step is totally optional, but I find it helps keep the rolls softer. I bake them in a preheated oven at 350°F (180°C) for about 30 minutes, or until they’re golden brown on top.
Once baked, I remove the rolls from the oven and let them cool slightly. While they’re cooling, I use this time to prepare the glaze.
In a bowl, I whisk the cream cheese until smooth. I add the powdered sugar and lemon juice, then mix with a fork until the glaze is silky and pourable. If it feels too thin, I add a little more powdered sugar. If it’s too thick, I add a few extra drops of lemon juice.
While the rolls are still warm, I drizzle the lemon cream cheese glaze over the top. This allows it to melt into the rolls just enough without completely soaking in.
Bake until golden, then drizzle with lemon cream cheese glaze.
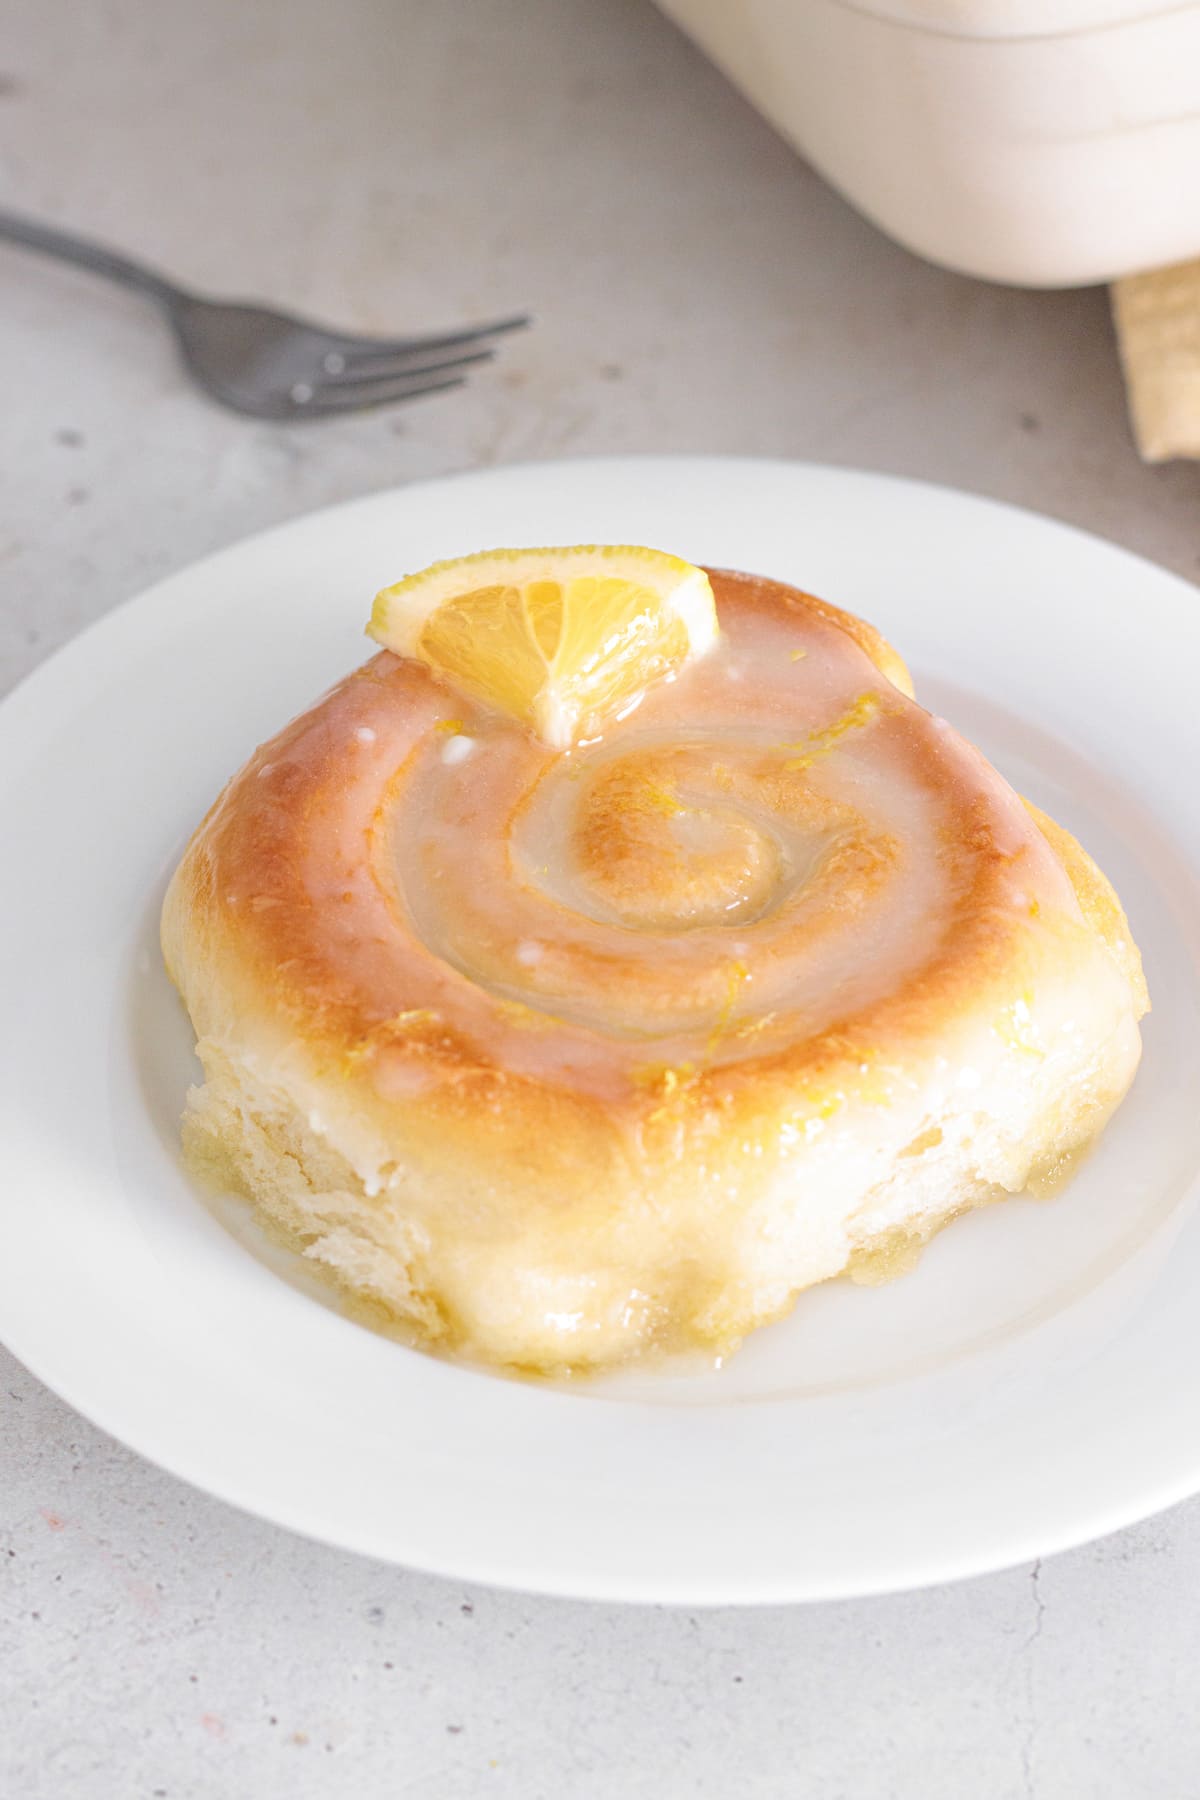
And that’s it! You can let them cool completely, but I highly recommend enjoying them while they’re still warm, they’re much softer that way. I like to serve them with a thin lemon slice and a light sprinkle of grated lemon zest.
Freshly baked Lemon Sweet Rolls with glossy lemon icing.
You can honestly tell from the photos how soft and good these are. That second rise really makes a difference, giving you fluffy rolls instead of those dense ones that almost make you choke… haha!
If you’re not serving them right away, you can warm them in the microwave for 10 to 15 seconds, or in the oven for about 8 to 10 minutes at 300°F. Trust me, they taste so much better when warm.
These don’t last long in our house, Rita and I usually finish them within 3 days max, and they stay good until then. I store the rolls in an airtight container at room temperature to keep them soft. I’ve also tried refrigerating them, but the cold dries them out and makes the texture firmer, so I don’t really recommend it.
If citrus desserts are your thing, you might also love Rita’s Italian Gluten-Free Almond Orange Cake. It’s naturally gluten-free, super fragrant, and one of our go-to cakes for family gatherings.
My Tips For making ahead or overnight
This recipe is PERFECT for making ahead or overnight. Honestly, the rolls taste even better this way because the dough has more time to develop flavor. If you’re prepping for a brunch or family gathering, this is my favorite way to do it.
If I'm making them the day before, I prepare the rolls all the way through slicing and arranging them in the baking dish. I cover the pan tightly and place it in the fridge overnight, or up to 24 hours. The cold slows down the yeast, so the rolls rise very slowly without overproofing. I don’t recommend going longer than that, as the dough will lose structure.
When it’s close to serving time, I take the rolls out of the fridge and let them sit at room temperature for about 45-60 minutes, until puffy again. Then I bake them as usual. Don't bake them straight from the fridge because they won’t rise properly and can turn out dense! That extra resting time makes a big difference in keeping them soft and fluffy.
I also like to make the glaze ahead of time and store it in an airtight container in the fridge. While the rolls cool slightly after baking, I let the glaze sit at room temperature for a few minutes and give it a quick stir so it’s smooth and pourable again.
These are an easy make-ahead option, and the rolls taste just as fresh and delicious.
Can You Freeze the Rolls and Bake Them Later?
Yes, I've frozen these Lemon Sweet Rolls many times but you need to do it before baking! I freeze them after shaping and slicing, once they’re arranged in the baking dish but before the second rise.
I cover the pan tightly with plastic wrap and then foil, and freeze the rolls for up to 1 month. I don’t recommend freezing them longer than that, as it can affect the yeast activity and final texture.
When I’m ready to bake, I just transfer the pan from the freezer straight to the fridge and let the rolls thaw overnight. The next day, I place them at room temperature for about 1 to 2 hours, until they’re fully thawed and puffy. Once they’ve risen properly, I bake them exactly as written.
I don’t recommend baking them straight from frozen. I’ve tried it before, and without time to thaw and complete that final rise, the rolls tend to turn out dense.
Easy Variations You Can Try
I’ve made these Lemon Sweet Rolls quite a few times already, and over time we’ve played around with a few simple variations. Even though the classic lemon version is still my favorite, I’ve come across a few easy and delicious tweaks worth sharing:
Lemon–vanilla combo: I add a small splash of vanilla extract to both the dough and to the glaze. It helps to soften the sharpness of the lemon just enough and gives the rolls a slightly smoother flavor. This is Rita's favorite variation. She says it’s less intense, since she’s not the biggest fan of very citrusy desserts.
Orange instead of lemon: I actually made this version by accident the first time, after realizing I didn’t have any lemons when I went to grab them, oops! I still wanted citrus sweet rolls and had oranges on hand, so I thought "why not?!" To our surprise, it works surprisingly well! The flavor is sweeter and less tangy, but still fresh and delicious.
Poppy seed rolls: If you like lemon poppy seed cake, you need to try this one too! I simply add a tablespoon of poppy seeds to the filling. The recipe is basically the same but the rolls get that subtle crunch. I make this variation quite a lot when baking for brunch.
I didn't try anything too crazy with this recipe because, as I said, I genuinely love the classic version. These are just a few small adjustments I've tested over time, depending on our mood or what we already have in the kitchen.
Plated soft Lemon Sweet Roll finished with a lemon slice.
These are hands down the best Lemon Sweet Rolls I’ve ever made, and I’m not just saying that because it’s my recipe. They’re so soft they practically melt in your mouth. Even Rita (who isn’t a big fan of citrusy desserts) absolutely loves them, so you know they’re good.
I’d love to know what you think once you try them. And if you have any questions or need a few extra tips along the way, feel free to reach out, I’m always happy to help. And if you’re already thinking about what to bake next, Rita’s Homemade Blueberry Muffins are another favorite around here, perfect for breakfast, brunch, or freezing for later!
Note: All product mentions are simply what I use in my own kitchen. None of the links are sponsored or affiliate.
Soft, fluffy Lemon Sweet Rolls filled with bright lemon sugar and finished with a smooth lemon cream cheese glaze. These rolls are easy to make, mostly hands-off, and perfect for weekend breakfasts, brunch, or special occasions.
Ingredients
For the dough:
1 ½cups whole milk, warm (about 110°F | 360ml)
2 ¼teaspoons instant dry yeast (7g)
1large egg (at room temperature)
3tablespoons granulated sugar (40g)
2teaspoons lemon zest (45g)
3tablespoons unsalted butter (melted | 45g)
4 -4¼cups all-purpose flour (sifted | 500-530g)
1tablespoon olive oil (for greasing the bowl)
For the filling:
7tablespoons unsalted butter (softened 2 tbsps for greasing the pan | 70g + 10g)
¾cup granulated sugar (150 g)
zest of 2 large lemons
For the lemon cream cheese glaze:
4ounces cream cheese (softened | 115g)
1¼cups powdered sugar (150g)
¼cup fresh lemon juice (60ml)
Instructions
1
Activate the yeastWarm the milk to about 110°F (warm to the touch, not hot). Pour it into a large bowl, sprinkle the yeast on top, and let it sit for 5 minutes until foamy.
2
Mix the doughAdd the egg, sugar, lemon zest, and melted butter to the bowl. Whisk until smooth. Gradually add the flour, mixing until a soft dough forms.
3
Knead and first riseKnead the dough for about 5 minutes, until smooth and elastic. Place it in a lightly oiled bowl, cover, and let rise in a warm place for about 2 hours, or until doubled in size.
4
Prepare the fillingIn a small bowl, rub the lemon zest into the sugar with your fingers. Mash the softened butter until spreadable.
5
Roll and fillRoll the dough into a 16×12-inch rectangle, about ¼ inch thick. Spread the butter evenly over the dough, then sprinkle the lemon sugar on top.
6
Shape the rollsRoll the dough tightly into a log. Slice into 12 rolls (about 1½ inches thick).
7
Second riseArrange the rolls in a buttered baking dish, leaving space between them. Cover and let rise for 45-60 minutes, until puffy and nearly touching.
8
BakePreheat the oven to 350°F (180°C). Brush the tops lightly with milk if desired. Bake for 30 minutes, or until golden brown.
9
Make the glazeWhisk the cream cheese until smooth. Add powdered sugar and lemon juice, mixing until silky and pourable.
10
Glaze and serveDrizzle the glaze over the warm rolls. Serve warm, optionally garnished with lemon zest or slices.
Nutrition Facts
Servings 12
Amount Per Serving
Calories360kcal
% Daily Value *
Total Fat15g24%
Saturated Fat9g45%
Cholesterol70mg24%
Sodium210mg9%
Potassium130mg4%
Total Carbohydrate49g17%
Dietary Fiber1.5g6%
Sugars21g
Protein7g15%
* Percent Daily Values are based on a 2,000 calorie diet. Your daily value may be higher or lower depending on your calorie needs.
Rita Dias
Food Blogger
Hi, I'm Rita, a full-time food blogger, mom of two beautiful cats, and passionate about cooking and photography. I want to share with you simple but delicious recipes that I make in my own kitchen.